Using RoSpy — Windows UI Inspector
RoSpy is a standalone inspector tool for identifying native Windows desktop UI elements, used together with the MS UI Automation component. It lets you point at a control in any Windows application, read its UI Automation properties, and copy a ready-to-use element selector as JSON — the same JSON you paste into the Element field of MS UI Automation activities.
Starting RoSpy
To launch RoSpy, run the executable from the Worker installation directory:
or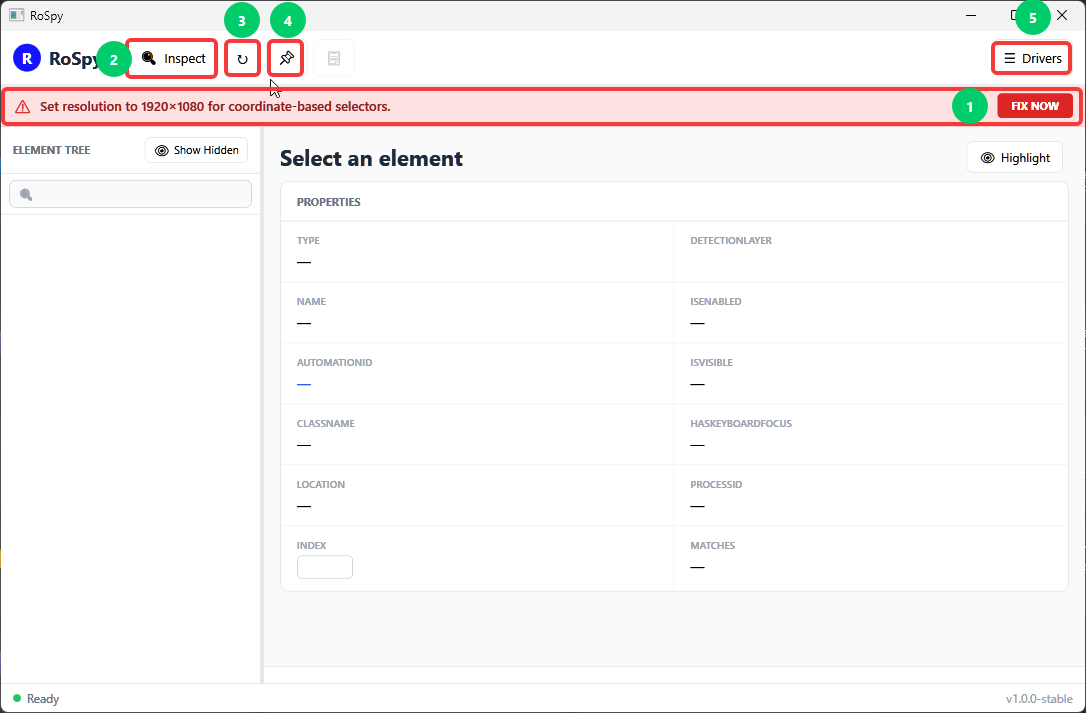
| # | Element | Description |
|---|---|---|
| 1 | Fix Now | Appears when the screen resolution is not 1920×1080. Coordinate-based selectors require this resolution and 100% display scaling — click Fix Now to apply it. |
| 2 | Inspect | Starts inspection mode, letting you point at and select a UI element. |
| 3 | Refresh | Reloads the element tree for the currently connected application. |
| 4 | Pin | Keeps the RoSpy window on top of the application being inspected. |
| 5 | Drivers | Opens the driver selection menu (see below). |
Inspecting an Element
- Click Inspect, then hover over the target element in the application window for about 3 seconds.
- The element's properties appear in the Properties panel on the right.
- Click Highlight to visually confirm the selected element on screen.

| Element | Description |
|---|---|
| Element Tree | Shows the full hierarchy of elements in the connected application. You can also select or search for an element directly from this tree. |
| Show Hidden | Shows or hides elements in the tree that are not currently visible on screen. |
| Properties | Displays the selected element's properties, such as Type, Name, AutomationId, ClassName, Location, ProcessId, IsEnabled, IsVisible, and HasKeyboardFocus. |
| Patterns | Displays the UI Automation patterns supported by the selected element (e.g., Value.Value, ScrollItem). |
Copying the Element Selector
Once an element is selected, scroll down to the JSON Preview panel to get the selector to use in a process.

- Review the generated selector JSON, which typically includes
ClassName,BoundingRectangle,ControlType,AutomationId, andName. - Click Copy JSON to copy the selector to the clipboard.
- Paste the copied JSON into the Element field of the target MS UI Automation activity.
Example JSON Structure
{
  "selector": {
    "ClassName": "WindowsForms10.Window.8.app.0.2f3e4cc_r3_ad1",
    "BoundingRectangle": "x=215,y=245,w=200,h=150",
    "ControlType": "Pane",
    "AutomationId": "pbThumbnail"
  },
  "options": {
    "index": 10
  }
}
You can remove any properties you don't need from the copied JSON before pasting it into the Element field — only the properties present are used to locate the element at runtime.
Technical Notes
Coordinate-based selection (using
BoundingRectangle) requires the screen resolution to be exactly 1920×1080 with 100% display scaling — use the Fix Now button if RoSpy warns that the resolution doesn't match. The Drivers menu lets you choose which underlying automation frameworks RoSpy uses to detect elements; all drivers are enabled by default.