Processes
The Processes interface serves as a central hub for creating, integrating, and managing automated processes within the Robusta Orchestrator. Users can view and organize all defined processes from this section. Access to the Processes interface requires valid user credentials.
Processes Interface
| Element | Description |
|---|---|
| Navigation Bar | Allows switching between Processes, Forms, Decision Tables, and Apps. |
| Create Process Button | Initiates the creation of a new process. |
| Import Process Button | Used to import an existing process from an XML file into the Processes interface. |
| Record Process Button | Automatically captures screen and browser actions, converting them into a process. |
| Search Bar | Enables searching for specific processes listed in the interface. |
| Main Content Area | Displays a comprehensive list of all defined processes. |

Create Process
This function is used for creating new processes.

- Click the Create Process button in the Processes interface.
- Fill in the required fields, then click the Create new model button.
Create Process Fields
| Element | Description |
|---|---|
| Model Name | The visible name of the model. Spaces are allowed. This is a required field. Special characters are not permitted. |
| Model Key | The technical name of the model. Spaces are not allowed. This is a required field. Special characters are not permitted. |
| Priority | Default value is 50. This field indicates the process priority; a lower number signifies higher priority when multiple processes are present. |
| Human Effort | Default value is 50. This field is used on the reporting screen to calculate the equivalent human effort (in man-days) performed by the robot. |
| Description | A descriptive text for the model, used for documentation purposes. This is an optional field. |
Import Process
This function is used to import an existing process from an XML file into the Processes interface.

- Click the Import Process button.
- Click the Select File button to choose the XML file, or drag and drop the XML file into the Drop a .bpmn or .bpmn20.xml BPMN XML file field.
- The imported process will be displayed in the Visual Editor.
Record Process
This feature automatically saves actions performed on screen and in the browser, converting them into processes.

Show Variables
While designing a process, the Show Variables button on the diagram toolbar opens a list of every variable currently used in the process, along with the activity (or scope) that produces it and its type. This makes it easier to trace where a variable comes from as a process grows large.

- Click the Show Variables button (list icon) on the diagram toolbar.
- The Variables panel opens, listing every variable used in the process.
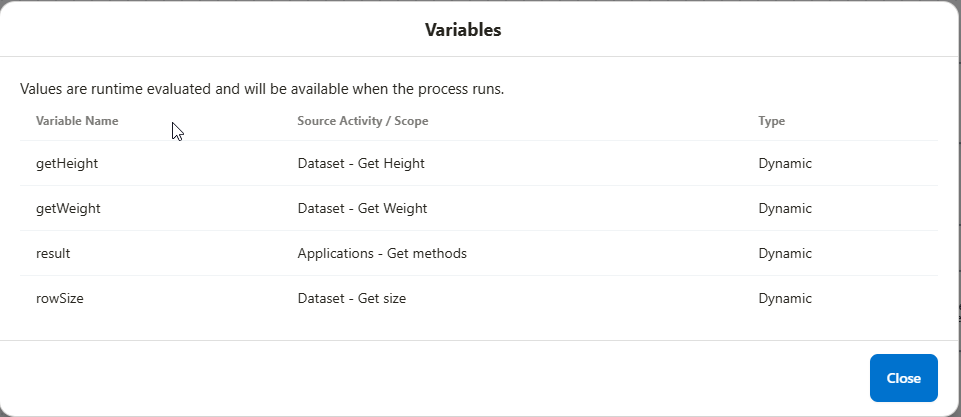
| Element | Description |
|---|---|
| Variable Name | The name of the variable as referenced elsewhere in the process (e.g., ${variableName}). |
| Source Activity / Scope | The activity (or scope) that produces this variable. |
| Type | The variable's type. Values evaluated at runtime are shown as Dynamic. |
Values shown as
Dynamicare runtime-evaluated and are only available once the process runs — the panel lists where each variable comes from, not its live value during design.
Debug Process
The Schedule & Run dialog, opened from the Run button on the diagram toolbar, includes a Debug Process option alongside Run Process. Debug Process starts the process in a paused, step-by-step execution mode instead of running it straight through.

- Click the Run button on the diagram toolbar to open the Schedule & Run dialog.
- Select an Application and Worker, then click Debug Process.

| Element | Description |
|---|---|
| Application | The App the process instance will run under. |
| Worker | The worker that will execute the process instance. |
| Save Model Before Run | Saves any unsaved changes to the process model before starting. |
| App Publish Required (Only Selected App) | Publishes only the selected App before running, if it has unpublished changes. |
| App Publish Required (All Apps that involved process) | Publishes every App that includes this process, if any has unpublished changes. |
| Run Process | Runs the process instance normally, without pausing. |
| Debug Process | Starts the process instance in step-by-step debug mode. |
Once Debug Process starts, the process diagram opens with playback controls (play, step forward, stop) and highlights the currently executing node. A panel below the diagram shows Variables, Executions, Log, Expression, and Script tabs for inspecting the instance's state at each step.

Debug Process is intended for troubleshooting a process during development — use it to step through activities one at a time and inspect variable values, rather than relying solely on Show Log after a full run.
Data Objects
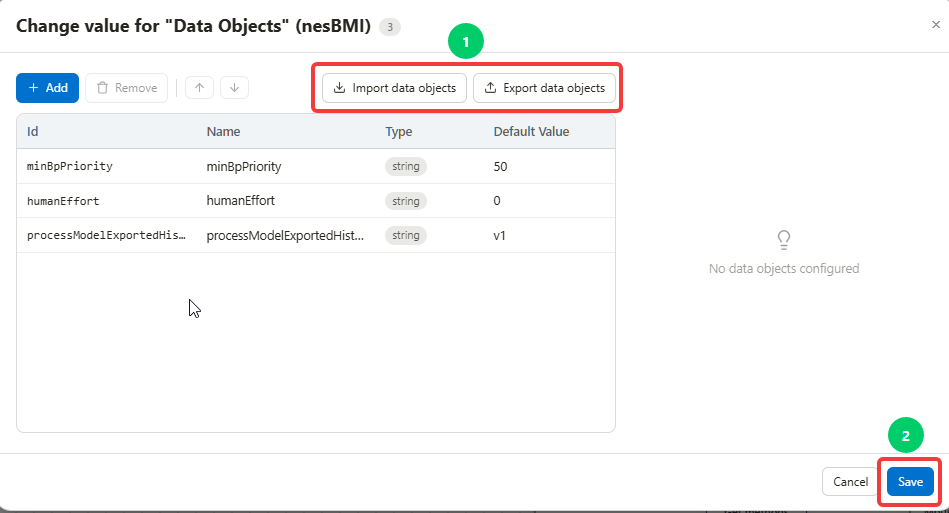
The Data Objects dialog, accessible from a process's properties, lists the process-level data properties (such as minBpPriority, humanEffort, and other custom values) available to the process, and now supports Import data objects and Export data objects.
| Element | Description |
|---|---|
| Add | Adds a new data object row. |
| Remove | Removes the selected data object row. |
| Import data objects | Imports data object definitions from a JSON file. |
| Export data objects | Exports the current data object definitions as a JSON file. |
| Id | The technical identifier of the data object. |
| Name | The display name of the data object. |
| Type | The data type of the data object (e.g., string). |
| Default Value | The value used when the process does not otherwise set this data object. |
Example JSON Structure
[
  {
    "dataproperty_id": "minBpPriority",
    "dataproperty_name": "minBpPriority",
    "dataproperty_type": "string",
    "dataproperty_value": "50",
    "_origDataPropertyId": "minBpPriority"
  },
  {
    "dataproperty_id": "humanEffort",
    "dataproperty_name": "humanEffort",
    "dataproperty_type": "string",
    "dataproperty_value": "0",
    "_origDataPropertyId": "humanEffort"
  }
]
After importing data objects, click Save to persist the change to the process.
Additional Information
- The license expiry date, displayed as Licensed by Robusta till YYYY-MM-DD in the top-left corner of the interface, indicates the last date a user can access the Processes interface.
- The last update timestamp, displayed as Today at HH:MM AM/PM at the bottom of the process window, shows when the process was last modified.
